Measures the candidate's ability to apply common soldier skills to protect himself or herself and the casualty in a battlefield scenario.
The candidate is required to complete 12 tasks and pass 9. These tasks are tested in a simulated battlefield scenario with the required equipment.
CAMOUFLAGE YOURSELF AND YOUR INDIVIDUAL EQUIPMENT
References: STP 21-1-SMCT, Task No. 052-191-1361
CONDITIONS: Given your paint stick and pieces of burlap or similar material.
STANDARDS: Camouflage your exposed skin and change the outline and pattern of your clothing, equipment, and weapon within 15 minutes to prevent detection.
PERFORMANCE STEPS:
1. Cover or remove the following items eliminating light reflection:
a. Mirrors.
b. Civilian and aviation eye glasses.
c. Watch crystals.
d. Plastic map cases.
e. Starched uniforms.
f. Dust goggles worn on top of helmets.
g. Cigarettes and pipes.
h. Red-filtered flashlights.
i. Snap buttons with exposed brass on prescribed equipment.
2. Camouflage your skin.
NOTE: Exposed skin reflects light.
a. Cover your skin oils, even if you have very dark skin, using paint sticks.
NOTES:
1. Paint sticks cover these oils and provide blending with the background.
2. Do not use oils or insect repellant to soften paint sticks. This defeats the purpose of paint sticks by making the skin shiny.
b. Use the following when applying paint on the face:
(1) Paint high, shiny areas (forehead, cheekbones, nose, ears, chin) with a dark color.
(2) Paint low, shadow areas with a light color.
c. Paint exposed skin on the back of the neck and hands with an irregular pattern.
3. Camouflage your BDU and helmet.
a. Roll your sleeves down and button all buttons.
b. Attach leaves, grass, small branches, or pieces of burlap to your uniform and helmet.
NOTES: 1. These items will distort shapes and blend colors with the natural background.
2. The BDU provides visual and near-infrared camouflage. (Do not use starched BDUs since starch counters the infrared properties of the dyes.)
4. Camouflage your personal equipment.
a. Cover or remove shiny items (rings, watches, necklaces).
b. Secure items that rattle or make noise when moved or worn.
5. Camouflage your prescribed equipment (LCE with accessories, weapon, and rucksack).
6. Ensure that camouflage does not reduce the function of the prescribed equipment.
7. Correctly performed all performance steps for each performance measure within 15 minutes.
REFERENCES:
Required Related
STP 21-1-SMCT, Task No. 052-191-1361
Cover, Concealment, and Camouflage
MOVE UNDER DIRECT FIRE
CONDITIONS: Given a tactical situation where you are coming under direct fire from across varied terrain and are armed with an M16-series rifle or M4-series carbine with a full magazine of blank rounds.
STANDARDS: Move under direct fire using the correct individual tactical fire and movement techniques that are dictated by terrain features.
PERFORMANCE STEPS:
NOTES: 1. Each individual movement technique may be tested on one portion of a lane, throughout the lane, or other combat lanes dictated by terrain features and lane flow of tested tasks.
2. Each movement technique will be tested only one time.
3. The actual distance for each movement technique will be determined by the test board chairperson.
1. Select an individual movement route.
a. Search the terrain to your front for—
(1) A gully, ravine, ditch, or wall at a slight angle to your direction of movement.
NOTE: These features provide cover and concealment when using the low or high crawl.
(2) Hedgerows or a line of thick vegetation.
NOTE: These features only provide concealment when using the low or high crawl.
(3) Large trees, rocks, stumps, fallen timber, rubble, vehicle hulks, folds or creases in the ground.
NOTE: These features provide cover and concealment for use as temporary positions.
Use the rush if the area between them has no concealment.
(4) High grass or weeds.
NOTE: These features only provide partial concealment. You may use the rush since the use of the high or low crawl could reveal your location by the movement of vegetation.
b. Select your next position (and the route to it) as one that—
(1) Exposes you to the least enemy fire.
(2) Does not require you to cross in front of other members of your element, masking their fires.
2. Determine the correct individual movement technique.
a. Select the high crawl when—
(1) The route provides cover and concealment.
(2) Poor visibility reduces enemy observation.
(3) Speed is required, but the terrain and vegetation are suitable only for the low crawl.
b. Select the low crawl when—
(1) The route provides cover or concealment less than 1-foot high.
(2) Visibility provides the enemy good observation.
(3) Speed is not required.
c. Select the rush when—
(1) You must cross open areas.
(2) Time is critical.
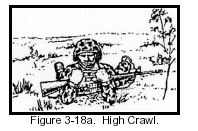
3. Use the high crawl (Figure 3-18a). (The distance will not exceed 25 meters.)

a. Keep your body off of the ground.
b. Rest your weight on your forearms and lower legs.
c. Cradle your weapon in your arms, keeping its muzzle off the ground.
d. Keep your knees well behind your buttocks so it stays low.
e. Move forward by alternately advancing your right elbow and left knee, and left elbow and right knee.
4. Use the low crawl (Figure 3-18b). (The distance will not exceed 20 meters.)
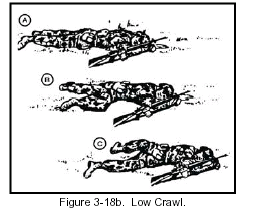
a. Keep your body as flat as possible to the ground.
b. Hold your weapon by grasping the sling at the upper sling swivel, letting the handguard rest on your forearm and the butt of the weapon drag on the ground, thus keeping the muzzle off the ground.
c. Move forward by—
(1) Pushing both arms forward while pulling your right leg forward.
(2) Pulling with both arms while pushing with your right leg.
(3) Continuing this push-pull movement until you reach your next position, changing your pushing leg frequently to avoid fatigue.
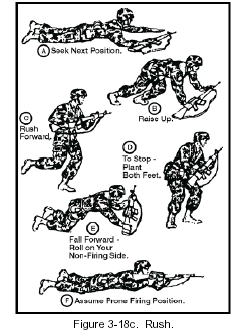
5. Use the rush to move from one covered position to another when enemy fire allows brief exposure (Figure 3-18c). (The distance will not exceed 50 meters.)
a. Move from your firing position by rolling or crawling.
b. Start from the prone position.
c. Select your next position by slowly raising your head.
d. Lower your head while drawing your arms into your body, keeping your elbows down and pulling your right leg forward.
e. Raise your body in one movement by straightening your arms.
f. Spring to your feet, stepping off with either foot.
g. Run to the next position—
(1) Keeping the distance short to avoid accurate enemy fire.
(2) Trying not to stay up any longer than 3 to 5 seconds so that the enemy does not have time to track you with automatic fire.
h. Plant both feet just before hitting the ground.
i. Fall forward by:
(1) Sliding your right hand down to the heel of the butt of your weapon.
(2) Breaking your fall with the butt of your weapon.
j. Assume a firing position.
(1) Roll on your side.
(2) Place the butt of your weapon in the hollow of your shoulder.
(3) Roll or crawl to a covered or concealed firing position.
REFERENCES:
Required Related
STP 21-1-SMCT, Task No. 071-326-0502
DISASSEMBLE AND ASSEMBLE AN M16-SERIES RIFLE
CONDITIONS: Given your assigned M16-series rifle and a magazine.
STANDARDS: Clear, disassemble, and assemble an M16-series rifle so that it functions correctly within 4 minutes.
PERFORMANCE STEPS:
1. Clear the rifle.
NOTE: The magazine will initially be in the rifle.
a. Turn the selector to "SAFE" (if applicable).
b. Remove the magazine.
c. Verify the rifle is clear.
2. Disassemble the rifle into 13 parts.
a. Remove the sling.
b. Push both takedown pins as far as they will go and separate the upper receiver from the lower receiver.
c. Pull back the charging handle.
d. Remove the bolt carrier.
e. Remove the charging handle.
f. Remove the firing pin retaining pin.
g. Put the bolt assembly in the locked position by pushing in the bolt.
h. Remove the firing pin by allowing it to drop out of the rear of the bolt carrier into your hand.
i. Remove the bolt cam pin by turning it one-quarter turn and lifting it out.
j. Pull the bolt assembly from the carrier.
k. Remove the extractor pin by pushing it out with the firing pin (use care not to damage the firing pin).
l. Lift out the extractor and spring, taking care so that the spring does not separate from the extractor.
m. Release the buffer by pressing the buffer and depressing the retainer.
n. Remove the buffer and action spring separating the buffer from the spring.
o. Do not disassemble the rifle further.
NOTE: There is no required sequence for disassembly.
3. Assemble the rifle.
a. Insert the spring and buffer.
b. Insert the extractor and spring.
c. Push the extractor pin in.
d. Slide the bolt into the carrier until the bolt cam pinhole in both the bolt carrier and the bolt are aligned.
e. Place the bolt cam pin by putting it in the bolt carrier and turning it one-quarter turn.
f. Drop in the firing pin to seat it.
g. Put the firing pin retaining pin in the bolt carrier to seat it.
h. Pull the bolt back.
i. Place the charging handle by engaging it, then pushing the charging handle part of the way in.
j. Slide the bolt carrier into the upper receiver.
k. Push the charging handle and bolt carrier together in the upper receiver.
l. Join the upper and lower receiver.
m. Engage the receiver pivot pin.
CAUTION: THE SELECTOR LEVER MUST BE ON "SAFE" BEFORE CLOSING THE UPPER RECEIVER.
n. Close the upper and lower receiver groups, seating the takedown pin and ensuring the selector switch is on "SAFE."
o. Replace the sling.
p. Insert the magazine.
NOTE: There is no required sequence for assembly.
REFERENCES:
Required Related
STP 21-1-SMCT, Task No. 071-311-2025
GTA 21-1-3
| 071-311-2025 | Maintain an M16-Series Rifle | Click Here |
PERFORM A FUNCTION CHECK ON AN M16-SERIES RIFLE
CONDITIONS: Given your assigned M16-series rifle. STANDARDS: Perform a function check within 1 minute; ensure
that the rifle operates properly with the selector switch in each position. PERFORMANCE STEPS: 1. Check an M16A1, M16A2, or M16A4 with the selector lever in
the "SAFE" position
a. Pull the charging handle to the rear and release it. b. Place the selector lever in the "SAFE" position. c. Pull the trigger (the hammer should not fall). 2. Check an M16A1, M16A2, or M16A4 with the selector lever in
the "SEMI" position. a. Place the selector lever in the "SEMI" position. b. Pull the trigger, holding it to the rear (the hammer should
fall). c. Continue to hold the trigger to the rear while pulling the
charging handle to the rear and releasing the charging handle. d. Release the trigger with a slow, smooth motion until the
trigger is fully forward (the hammer should not fall). e. Pull the trigger (the hammer should fall). 3. Check an M16A1 with the selector lever in the "AUTO"
position. a. Place the selector lever in the "AUTO" position. b. Pull the charging handle to the rear and release it. c. Pull the trigger holding it to the rear (the hammer should
fall). d. Continue to hold the trigger to the rear while pulling the
charging handle to the rear and releasing the charging handle. e. Release the trigger. f. Pull the trigger (the hammer should not fall). 4. Check an M16A2 or M16A4 with the selector lever in the
"BURST" position. a. Place the selector lever in the "BURST" position. b. Pull the charging handle to the rear and release it. c. Pull the trigger, holding it to the rear (the hammer should
fall). d. Continue to hold the trigger to the rear while pulling the
charging handle to the rear and releasing the charging handle. e. Repeat step 4d two more times. f. Release the trigger. g. Pull the trigger (the hammer should fall). 5. Inform the evaluator of any malfunction of the rifle during
the function check. REFERENCES: Required Related TM 9-1005-249-10 STP 7-11BC1-SM-TG, Task No. 071-311-2026
References: STP 21-1 SMCT #071-311-2026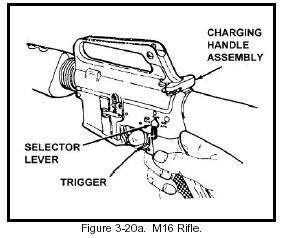
DISASSEMBLE AND ASSEMBLE AN M4 OR M4A1 CARBINE
CONDITIONS: Given your assigned M4 or M4A1 carbine and a magazine.
STANDARDS: Clear, disassemble, and assemble the carbine so that it functions correctly within 4 minutes.
PERFORMANCE STEPS:
1. Clear the carbine.
NOTE: The magazine will initially be in the carbine.
a. Remove the magazine.
b. Cock the carbine.
c. Turn the selector to "SAFE" (if applicable).
NOTE: The selector cannot be turned to "SAFE" unless the carbine is cocked.
d. Lock the bolt open.
(1) Pull the charging handle rearward.
(2) Press the bottom of the bolt catch.
(3) Allow the bolt to move forward until it engages the bolt catch.
(4) Return the charging handle to the forward position.
e. Check the receiver and chamber to ensure that they do not contain ammunition.
2. Disassemble the carbine into 13 parts.
a. Remove the sling.
b. Push the takedown pin as far as it will go and pivot the upper receiver from the lower receiver.
c. Push the receiver pivot pin.
d. Separate the upper and lower receivers.
e. Pull back the charging handle.
f. Remove the bolt carrier and bolt.
g. Remove the charging handle.
h. Remove the firing pin retaining pin.
i. Put the bolt assembly in the locked position by pushing in the bolt.
j. Remove the firing pin by allowing it to drop out of the rear of the bolt carrier into your hand.
k. Remove the bolt cam pin by turning it one-quarter turn and lifting it out.
l. Pull the bolt assembly from the carrier.
m. Remove the extractor pin by pushing it out with the firing pin (use care not to damage the firing pin).
n. Lift out the extractor and spring, taking care that the spring does not separate from the extractor.
o. Release the buffer by pressing the buffer and depressing the retainer.
p. Remove the buffer and action spring separating the buffer from the spring.
NOTE: There is no required sequence for disassembly.
3. Assemble the carbine.
a. Insert action spring and buffer.
b. Insert extractor and spring.
c. Push in extractor pin.
d. Slide bolt into carrier.
WARNING: BE SURE THAT THE CAM PIN IS INSTALLED IN THE BOLT GROUP. IF IT IS NOT, THE CARBINE CAN STILL FIRE AND WILL EXPLODE.
e. Replace bolt cam pin.
f. Drop in and seat firing pin.
AMEDDC&S Pam 350-10
g. Pull bolt back.
h. Replace retaining pin.
i. Engage, then push charging handle in part of the way.
j. Slide in bolt carrier group.
k. Push in charging handle and bolt carrier group together.
l. Join upper and lower receivers.
m. Engage receiver pivot pin.
n. Close upper and lower receiver groups. Push in takedown pin.
o. Replace the sling.
p. Insert the magazine.
NOTE: There is no required sequence for assembly.
REFERENCES:
Required Related
TM 9-1005-319-10
STP 21-1-SMCT, Task No. 071-100-0004
CORRECT MALFUNCTION OF AN M4 CARBINE OR M16-SERIES RIFLE
CONDITIONS: Given a magazine with seven blank rounds and one dummy round and your assigned M4 carbine or M16-series rifle.
STANDARDS: Eliminate the stoppage within 10 seconds when the rifle fails to fire.
PERFORMANCE STEPS:
1. React to a situation by returning fire and reducing stoppage by applying S-P-O-R-T-S.
NOTE: If your weapon malfunctions, remember S-P-O-R-T-S. This key word will help
you remember these actions in sequence: Slap, Pull, Observe, Release, Tap, Shoot.
a. Slap upward on the magazine to make sure it is properly seated.
b. Pull the charging handle all the way back.
c. Observe the ejection of the case or cartridge. Look into the chamber and check for obstructions.
d. Release the charging handle to feed a new round into the chamber. Do not ride the charging handle.
e. Tap the forward assist.
f. Shoot. If the rifle still does not fire, inspect it to determine the cause of the stoppage or malfunction and take appropriate remedial action.
2. Perform steps 1a through 1f in sequence.
3. Perform steps 1a through 1f in 10 seconds.
REFERENCES:
Required Related
FM 3-22.9
TM 9-1005-249-10
STP 7-11BC1-SM-TG, Task No. 071-311-2029
PERFORM A FUNCTION CHECK ON AN M4 OR M4A1 CARBINE
CONDITIONS: Given your assigned M4 or M4A1 carbine.
STANDARDS: Perform a function check within 1 minute; ensure that the carbine operates properly with the selector switch in each position.
PERFORMANCE STEPS:
1. Check an M4 or M4A1 carbine with the selector lever in the "SAFE" position.
a. Pull the charging handle to the rear and release it.
b. Place the selector lever in the "SAFE" position.
c. Pull the trigger (the hammer should not fall).
2. Check an M4 or M4A1 carbine with the selector lever in the "SEMI" position.
a. Place the selector lever in the "SEMI" position.
b. Pull the trigger, holding it to the rear (the hammer should fall).
c. Continue to hold the trigger to the rear while pulling the charging handle to the rear and releasing the charging handle.
d. Release the trigger with a slow, smooth motion until the trigger is fully forward (the hammer should not fall).
e. Pull the trigger (the hammer should fall).
3. Check an M4A1 carbine with the selector lever in the "AUTO" position.
a. Place the selector lever in the "AUTO" position.
b. Pull the charging handle to the rear and release it.
c. Pull the trigger (the hammer should fall).
d. Hold the trigger to the rear and cock the weapon.
e. Fully release the trigger then pull it to the rear again; the hammer should not fall.
4. Check an M4 carbine with the selector lever in the "BURST" position.
a. Place the selector lever in the "BURST" position.
b. Pull the charging handle to the rear and release it.
c. Pull the trigger, holding it to the rear (the hammer should fall).
d. While holding the trigger to the rear, pull the charging handle to the rear and release the charging handle.
e. Repeat step 4d two more times.
f. Release the trigger.
g. Pull the trigger (the hammer should fall).
5. Inform the evaluator of any malfunction of the carbine during the function check.
REFERENCES:
Required Related
TM 9-1005-319-10
STP 7-11BC1-SM-TG, Task No. 071-100-0005
Figure 3-22. Perform a Function Check on an M4 or M4A1 Carbine.
DISASSEMBLE AND ASSEMBLE AN M9 PISTOL AND PERFORM A FUNCTION CHECK
CONDITIONS: Given an M9 pistol and a magazine.
STANDARDS: Clear, disassemble, and assemble an M9 pistol and perform a function check within 3 minutes.
PERFORMANCE STEPS:
1. Clear the pistol.
NOTE: The lever will initially be set in the "FIRE" position and an empty magazine will be in the pistol.
a. Place the safety lever in the "SAFE" position.
b. Hold the pistol in the raised pistol position.
c. Depress the magazine release button; remove the magazine from the pistol.
d. Pull the slide to the rear.
e. Push the slide stop up, locking the slide to the rear.
f. Look into the chamber to ensure that it is empty.
2. Disassemble the pistol.
a. Depress the slide stop and let the slide go forward.
b. With your right hand, hold the pistol with the muzzle slightly raised.
c. With your forefinger, press the disassembly lever button (Figure 3-16a).
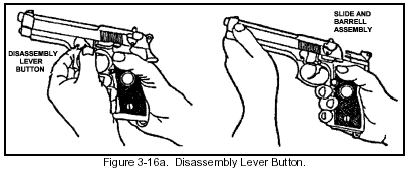
d. Rotate the disassembly lever downward until it stops.
e. Pull the slide and barrel assembly forward (Figure 3-16a) and remove it from the receiver.
f. Slightly compress the recoil spring and spring guide. At the same time, lift them up and remove them, allowing the recoil spring to stretch slowly (Figure 3-16b).
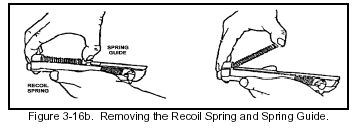
g. Separate the recoil spring from the spring guide.
h. Push in on the locking block plunger while pushing the barrel forward slightly. Lift and remove the locking block and barrel assembly from the slide (Figure 3-16c).
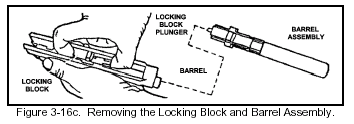
3. Assemble the pistol (Figure 3-16d).
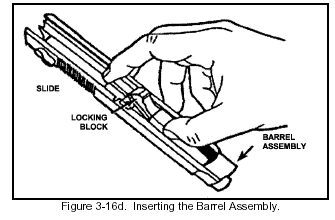
a. Grasp the slide with the bottom facing up.
b. With the other hand, grasp the barrel assembly with the locking block facing up.
c. Insert the muzzle into the forward end of the slide. At the same time, lower the rear of the barrel assembly by moving the barrel slightly downward with light thumb pressure. The barrel will fall into place.
d. Insert the recoil spring guide into the recoil spring (Figure 3-16e).

e. Insert the end of the recoil spring and the recoil spring guide into the recoil spring housing. At the same time, compress the recoil spring and lower the spring guide until it is fully seated on the locking block cutaway (Figure 3-16f).
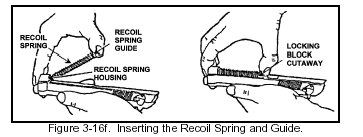
CAUTION: BE SURE THAT THE HAMMER IS UNCOCKED AND FIRING PIN BLOCK LEVER IS IN THE DOWN POSITION. IF THE HAMMER IS COCKED, CAREFULLY AND MANUALLY LOWER THE HAMMER. DO NOT PULL THE TRIGGER WHILE PLACING THE SLIDE ONTO THE RECEIVER.
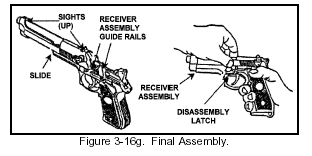
f. Push the firing pin block lever down. Grasp the slide and barrel assembly, with the sights up and align the slide on the receiver assembly guide rails (Figure 3-16g).
g. Push until the rear of the slide is a short distance beyond the rear of the receiver assembly and hold. At the same time, rotate the disassembly latch lever upward. A click indicates a positive lock.
4. Perform a function check.
a. Depress the slide stop. Insert an empty magazine into the pistol and ensure that the magazine catch locks the magazine in place.
b. Retract the slide and release it. The magazine follower should push up on the slide stop, locking the slide to the rear.
c. Depress the magazine release button allowing the magazine to fall free.
d. Ensure that the decocking/safety lever is in the safe (down) position. Depress the slide stop allowing the slide to return fully forward. At the same time, the hammer should fall to the full forward position.
e. Pull and release trigger. Firing pin block should move up and down.
f. Place decocking/safety lever in fire (up) position.
g. Pull trigger to check double action. Hammer should cock and fall.
h. Pull trigger again and hold to rear. Manually retract and release slide while holding trigger to the rear. Release trigger, click should be heard, hammer should not fall.
i. Pull trigger to check single action. Hammer should fall.
REFERENCES:
Required Related
STP 21-1-SMCT, Task No. 071-004-0001
CONDITIONS: You are in mask only, with remaining assigned MOPP gear available.
You have a full canteen of water, M8 detector paper, and M291 skin decontaminating kit (SDK). Your skin and eyes are contaminated.
STANDARDS: Decontaminate all exposed skin and your eyes within 5 minutes.
PERFORMANCE STEPS:
1. Decontaminate your skin using the M291 SDK.
a. Remove one decontaminating packet from the M291 SDK.
b. Tear packet open at notch. Remove packet, fully unfold applicator pad, and slip fingers into handle.
c. Scrub skin starting with hands, including back of hand, palm, and fingers.
d. Hold breath, close eyes, and lift the hood and mask away from chin.
e. Continue to hold breath and scrub face.
f. Wipe inside of mask which touches the face, then drop packet to the ground.
g. Reseal, clear, and check mask.
h. Using a second packet, scrub neck and ears and wipe hands.
i. Drop the decontamination packet to the ground.
CAUTION: THE M291 SKIN DECONTAMINATING KIT IS FOR EXTERNAL USE ONLY. KEEP DECONTAMINATING POWDER OUT OF YOUR EYES, MOUTH, CUTS, AND WOUNDS. THE DECONTAMINATING POWDER MAY SLIGHTLY IRRITATE YOUR SKIN OR EYES. USE WATER TO WASH THE TOXIC AGENT OUT OF YOUR EYES, CUTS, OR WOUNDS. AFTER DECONTAMINATION WITH WATER, COVER ANY EXPOSED CUTS OR WOUNDS WITH APPROPRIATE FIRST AID WRAP OR BANDAGES BEFORE HANDLING THE DECONTAMINATING PACKAGE.
2. Remove chemical agent contamination from the eyes.
a. Remove canteen from load-bearing equipment and open canteen cap.
b. Check canteen mouth with M8 detector paper.
c. Hold breath.
d. Lift the mask and continue to hold breath.
e. Flush the eyes with water from the canteen, ensuring that the water does not flow from one eye to the other eye.
f. Reseal, clear, and check the mask.
REFERENCES:
Required Related
FM 3-5
FM 3-11.4
TM 3-4230-229-10
TM 3-4230-235-10
STP 21-1-SMCT, Task No. 031-503-1013
| 031-503-1013 |
Decontaminate Yourself and Individual Equipment Using Chemical Decontaminating Kits | Click Here |
PROTECT YOURSELF FROM CHEMICAL/BIOLOGICAL CONTAMINATION USING
YOUR ASSIGNED PROTECTIVE MASK CONDITIONS: Given your assigned protective mask with hood
and carrier. STANDARDS: Don, clear, and check your mask within 9 seconds. PERFORMANCE STEPS: NOTE: You must complete steps 1 through 3 within 9 seconds. 1. Don the mask as quickly as possible. a. Stop breathing and close your eyes. (Time starts now.) b. Remove your helmet. (1) If you have the M17-, M24-, M25-, M40-, M43-, or M45-series
protective mask, put your helmet between your legs (above your knees) or hold
your rifle between your legs and place your helmet on the muzzle. If you drop
your helmet, continue to mask. (2) If you have the M42-series protective mask, remove your
helmet and place it in a convenient location. Avoid placing it on a contaminated
surface if possible. WARNING: DO NOT WEAR CONTACT LENSES WITH THE PROTECTIVE
MASK. REMOVE CONTACT LENSES WHEN THE USE OF CHEMICAL AGENTS IS IMMINENT. c. Take off your glasses, if applicable. d. Open the mask carrier with one hand. e. Grasp the mask assembly with your other hand and remove it
from the carrier. f. Put your chin in the chin pocket and press the facepiece
snugly against your face. NOTE: The temple and forehead straps have already been
adjusted during fitting. g. Grasp the tab and pull the head harness over your head.
Ensure that your ears are between the temple straps and the cheek straps. Ensure
that the head harness is pulled far enough over so that the forehead straps are
tight. h. Use one hand to tighten the cheek straps, one at a time,
while holding the head pad centered on the back of your head with the other
hand. Ensure that the straps lay flat against your head. 2. Clear the mask. a. Seal the outlet valve by pushing in on the center of the
outlet valve cover with one hand. b. Blow out hard to ensure that any contaminated air is forced
out around the edges of the facepiece. 3. Check the mask. a. Cover the inlet port of the filter canister (M40- and
M45-series) or the inlet port of the armor quick disconnect (M42-series) with
the palm of your hand and breathe in. b. Ensure that the facepiece collapses against your face and
remains so while you hold your breath (indicates that the mask is airtight). c. Remove any hair, clothing, or other matter between your face
and the mask if the facepiece does not collapse to your face. 4. Complete steps 1 through 3 within 9 seconds. 5. Resume breathing. 6. Secure the mask hood. NOTE: There are no time standards for donning the hood. CAUTION: BE CAREFUL WHEN PULLING ON THE HOOD, BECAUSE IT
COULD SNAG ON THE BUCKLES OF THE HEAD HARNESS AND TEAR. a. If you have the M17-, M25-, M42-, or M43-series protective
mask, pull the hood over your head and zip the front closed to cover all bare
skin. b. If you have the M24- or M45-series protective mask, pull the
M7 hood over your helmet and head so that it covers your shoulders. c. If you have the M40-series protective mask, don the hood so
that it lies smoothly on your head. (1) For masks equipped with the regular hood— (a) Grasp the back edge of the hood skirt. (b) Pull the hood completely over your head so that it covers
the back of your head, neck, and shoulders. (c) Zip the front of the hood closed by pulling the zipper
slider downward. (d) Tighten the drawcord. (e) Secure the underarm straps by fastening and adjusting them. (f) Put on your helmet. If you have a combat vehicle crewman (CVC)
helmet— (i) Disconnect the boom microphone from the helmet. (ii) Connect the mask microphone to the receptacle in the
helmet. (iii) Grasp the helmet next to the ear cups, with your hand
spread as far as possible. (iv) Place the helmet over your head, tilting the helmet forward
slightly so that the first contact when putting it on is with the forehead
surface of the mask. (v) Rotate the helmet back and down over your head until it is
seated in position. (2) For masks equipped with the quick-doff hood— (a) Place your hands inside the hood and expand the elastic
gathering around the neck of the hood. (b) Stretch and carefully pull the hood over your head so that
the hood covers your head, neck, and shoulders. (c) Fasten and adjust the underarm straps. (d) Put on your helmet (see above for the CVC helmet). 7. Close the mask carrier and continue your mission. 8. Perform all steps in sequence without becoming a casualty. REFERENCES: Required Related FM 3-3 FM 3-11.4 TM 3-4240-279-10 TM 3-4240-280-10 TM 3-4240-346-10
References:
STP 21-1-SMCT, Task No. 031-503-1035
| 031-503-1035 |
Protect Yourself From Chemical/Biological Contamination Using Your Assigned Protective Mask (M40-Series) | Click Here |
PROTECT YOURSELF FROM NBC INJURY/CONTAMINATION WITH
MOPP GEAR
CONDITIONS: You are in mask only with remaining assigned MOPP gear
available. STANDARDS: Perform all steps in sequence and achieve MOPP 4
within 8 minutes. PERFORMANCE STEPS: 1. Put on MOPP gear for MOPP 1. a. Don the trousers. (1) Put the overgarment trousers on over your normal duty
uniform. (2) Secure the trousers by snapping and zipping them and
adjusting the waistband for a snug fit. (3) Do not fasten the bottom of the trousers at this time. b. Don the jacket. (1) Put on the overgarment jacket. (2) Zip it up. (3) Fasten the snaps/Velcro
References:
STP 21-1-SMCT, Task No. 031-503-1015
c. Secure the jacket to the trousers by snapping the three snaps across the back of the jacket to the trousers.
2. Put on additional MOPP gear (protective overboots) to reach MOPP 2. (There are three types of protective overboots described below; apply the appropriate type.)
a. Put the older model chemical protective overboots on over your leather combat boots, lacing them IAW the instructions provided in the package.
NOTE: The older model has a single eyelet at the rear.
(1) Don the cover on either foot by centering your foot on the sole.
(2) Smooth the excess material as flat as possible.
(3) Lace the overboots.
(a) Thread the lace through the front eyelet so that the ends are the same length.
(b) Tie a single hitch by passing one lace end through each eyelet from the inside to the outside, drawing each lace end tight.
(c) Pass both ends through the rear eyelet from the inside to the outside.
(d) Bring the ends back through the side eyelets.
(e) Tighten the lace by working the slack out of it between the side and back eyelets.
NOTE: The lace should hold the rear eyelet firmly against the boot.
(4) Tie the lace tightly across the instep with a single hitch.
(5) Wrap the excess lace around your leg, tying the ends with a reef or bowknot.
(Go to step 2d.)
b. Put the newer model chemical protective overboots on over your leather combat boots, lacing them IAW the instructions provided in the package.
NOTE: The newer model has two rear eyelets.
(1) Don the cover on either foot by centering your foot on the sole.
(2) Tuck the excess front material under the front of your foot.
(3) Lace the overboots.
(a) Thread the lace through the front eyelet so that both ends are the same length.
(b) Pass each lace end through a side eyelet from the inside to the outside.
(c) Draw the lace up tightly, fastening it with a single knot.
(d) Pass the ends through the rear eyelets from the inside to the outside.
(e) Pull the lace up firmly, positioning the fishtails neatly at the sides of your ankle.
(f) Tie the lace firmly with a single knot in front.
(4) Wrap the loose lace ends around your leg, tying them firmly in front with a bowknot and tucking in the loose ends. (Go to step 2d.)
NOTE: The newer model method is being taught at the U.S. Army Chemical School.
Units that still have the older model should continue to use the older model donning instructions.
c. Put the green vinyl overboots on over your leather combat boots, securing them by pulling the rubber bands around the metal buttons.
d. Blouse the overgarment trouser legs over the chemical protective overboots.
e. Secure the closures of the overgarment trouser legs (zip and secure Velcro
® closures of the overgarment trouser legs and tie the drawstrings firmly).3. Put on additional MOPP gear to reach MOPP 4.
a. Secure the MOPP gear by zipping all zippers and closing all closures.
b. Put on the chemical protective gloves (rubber gloves and liners).
c. Pull the elastic cuffs of the overgarment jacket sleeves over the cuffs of the chemical protective gloves.
REFERENCES:
Required Related
FM 3-11.4
TM 3-4240-279-10
TM 3-4240-280-10
TM 3-4240-300-10-2
STP 21-1-SMCT, Task No. 031-503-1015
| 031-503-1015 |
Protect Yourself From NBC Injury/Contamination With the Appropriate Mission-Oriented Protective Posture (MOPP) Gear | Click Here |
PERFORM SELF-AID FOR MILD NERVE AGENT POISONING
REFERENCES: STP 21-1-SMCT, Task No. 081-831-1044
CONDITIONS: You are wearing your protective mask and MOPP gear (or remaining MOPP gear is available) and are experiencing mild signs and symptoms of nerve agent poisoning. One set of MARK I nerve agent antidote autoinjectors or one Antidote Treatment, Nerve Agent, Autoinjectors (ATNAA) is available.
STANDARDS: Correctly identify six of eight signs and symptoms of mild nerve agent poisoning, administer the antidote to self in the proper sequence, and secure the autoinjector within 5 minutes.
PERFORMANCE STEPS:
NOTES: 1. The ATNAA system is a nerve agent antidote device that will be used by the Armed Forces. A single ATNAA delivers both the atropine and pralidoxime chloride (2 PAM Cl). The ATNAA will replace the MARK I when supplies are exhausted.
2. Nerve agent antidote training aids will be used to train and evaluate this task. Actual autoinjectors will not be used.
1. Identify mild signs and symptoms of nerve agent poisoning by stating six of the eight to the evaluator.
a. Unexplained runny nose.
b. Unexplained sudden headache.
c. Excessive flow of saliva (drooling).
d. Tightness of the chest causing breathing difficulties.
e. Difficulty seeing (blurred vision).
f. Muscular twitching around area of exposed or contaminated skin.
g. Stomach cramps.
h. Nausea.
2. Administer either the MARK I or ATNAA to self (self-aid).
a. MARK I.
(1) Prepare to administer one atropine injection.
(a) Remove one set of MARK I from your protective mask carrier, from the pocket of the MOPP suit, or from another location as specified by your unit standing operating procedure (SOP).
(b) With your nondominant hand, hold the set of injectors by the plastic clip with the big injector on top.
(c) With your dominant hand, check the injection site in order to avoid buttons and objects in pockets where injecting. For injections into the thigh, grasp the trouser cargo pocket and pull forward, clearing possible obstructions from the site.
(d) Grasp the small injector without covering or holding the needle (green) end and pull it out of the clip with a smooth motion.
(e) Form a fist around the autoinjector with the needle end (green) extending beyond the little finger end of the fist. Be careful not to inject yourself in the hand.
NOTE: If the injection is accidentally given in the hand, another small injector must be obtained and the injection given in the proper site.
(f) Place the needle end of the injector against the outer thigh muscle. For injections into the thigh, grasp the trouser cargo pocket and pull forward, clearing possible obstructions from the site.
NOTES: 1. The injection may be given in any part of the lateral thigh muscle from about a hand's width above the knee to a hand's width below the hip joint. 2. Very thin soldiers should give the injection in the upper, outer part of the buttocks.
WARNING: WHEN INJECTING ANTIDOTE IN THE BUTTOCKS, BE VERY CAREFUL TO INJECT ONLY INTO THE UPPER, OUTER QUARTER OF THE BUTTOCKS TO AVOID HITTING THE MAJOR NERVE THAT CROSSES THE BUTTOCKS. HITTING THE NERVE MAY CAUSE PARALYSIS.
(2) Administer the atropine injection.
(a) Push the injector into the muscle with firm, even pressure until it functions.
NOTE: A jabbing motion is not necessary to trigger the activating mechanism.
(b) Hold the injector firmly in place for at least 10 seconds.
(c) Remove the injector from your muscle and carefully place this used injector between two fingers of the hand holding the plastic clip.
(3) Prepare to administer one 2 PAM Cl injection.
(a) Pull the large injector out of the clip and form a fist around the autoinjector with the needle end extending beyond the little finger.
(b) Place the needle (black) end of the injector against the injection site.
(4) Administer the 2 PAM Cl injection.
(a) Push the injector into the muscle with firm, even pressure until it functions.
(b) Hold the injector firmly in place for at least 10 seconds.
(5) Drop the plastic clip without dropping the used injectors.
(6) Go to step 3, "Secure the used injectors."
b. ATNAA.
(1) Prepare to administer one ATNAA.
(a) Remove one ATNAA from your protective mask carrier, from the pocket of the MOPP suit, or from another location as specified by your unit SOP.
(b) Remove the autoinjector from the pouch.
(c) With your dominant hand, hold the ATNAA in your closed fist with the green needle end extending beyond the little finger in front of you at eye level.
(d) With your nondominant hand, grasp the safety (gray) cap with the thumb and first two fingers.
CAUTION: DO NOT COVER OR HOLD THE NEEDLE END WITH YOUR HAND, THUMB, OR FINGERS. YOU MAY ACCIDENTALLY INJECT YOURSELF.
(e) Pull the safety cap off the bottom of the injector with a smooth motion and drop it to the ground.
(f) With the nondominant hand, check the injection site in order to avoid buttons and objects in pockets where injecting. For injections into the thigh, grasp the trouser cargo pocket and pull forward, clearing possible obstructions from the site.
(g) Hold the ATNAA in your closed fist with the green needle end pointing out by your little finger.
(h) Place the needle end of the injector against the outer thigh muscle.
NOTES: 1. The injection may be given in any part of the lateral thigh muscle from about a hand's width above the knee to a hand's width below the hip joint. 2. Very thin soldiers should give the injection in the upper, outer part of the buttocks.
WARNING: WHEN INJECTING ANTIDOTE IN THE BUTTOCKS, BE VERY CAREFUL TO INJECT ONLY INTO THE UPPER, OUTER QUARTER OF THE BUTTOCKS TO AVOID HITTING THE MAJOR NERVE THAT CROSSES THE BUTTOCKS. HITTING THE NERVE MAY CAUSE PARALYSIS.
(2) Administer the injection.
(a) Push the injector into the muscle with firm, even pressure until it functions.
NOTE: A jabbing motion is not necessary to trigger the activating mechanism.
(b) Hold the injector firmly in place for at least 10 seconds.
(c) Remove the injector from your muscle.
3. Secure the used injectors. (The candidate will state steps 3a and 3b to the evaluator. The steps will not be performed.)
a. Use a hard surface to bend each needle to form a hook without tearing protective gloves or clothing.
b. Push the needle of each used injector (one at a time) through one of the pocket flaps of the protective overgarment.
WARNING: IF, WITHIN 5 TO 10 MINUTES AFTER ADMINISTERING THE FIRST SET OF INJECTIONS, YOUR HEART BEGINS BEATING RAPIDLY AND YOUR MOUTH BECOMES VERY DRY, DO NOT ADMINISTER ANOTHER SET OF INJECTIONS.
NOTE: After you have given yourself the first set of MARK I injections or one ATNAA, you most likely will not need additional antidote if you are ambulatory and know who and where you are. If needed, only a buddy, a combat lifesaver, or medical personnel will give additional injections.
REFERENCES:
Required Related
DVC 08-36
DVC 08-37
FM 4-25.11
FM 8-285
STP 21-1-SMCT, Task No. 081-831-1044
| 031-503-1036 | Maintain Your Assigned Protective Mask | Click Here |
STORE THE M40-SERIES PROTECTIVE MASK WITH HOOD
CONDITIONS: Given the "ALL CLEAR" signal, remove your protective mask with hood and store it in its carrier.
STANDARDS: Remove protective mask and correctly store it inside its carrier within 1 minute.
PERFORMANCE STEPS:
1. Remove protective mask with hood after the "all clear" signal is given.
a. Remove helmet.
b. Unfasten the underarm straps.
c. Loosen the draw cord (except quick-doff hood).
d. Unzip the zipper on the hood (except quick-doff hood).
e. Remove the hood.
f. Loosen the cheek straps.
g. Remove the mask.
h. Replace helmet on head.
i. Remove any moisture that has accumulated on the hood and mask.
2. Store mask with hood.
a. Hold the front of the mask in a horizontal position.
b. Smooth the hood over the mask.
c. Pull the head harness over the front of the mask.
d. Fold the two edges of the hood over the outlet valve to create a "V" in the front of the hood.
e. Store the underarm straps and the cord in the "V."
f. Fold the "V" upward to cover the eye lenses without letting the hood cover the chin opening.
g. Store the mask with hood inside the carrier with the eye lenses up and facing away from the body.
h. Close the carrier opening.
REFERENCES:
Required Related
STP 21-1-SMCT, Task No. 031-503-1036
PROTECT YOURSELF FROM BIOLOGICAL OR CHEMICAL
INJURY/CONTAMINATION WHEN REMOVING MOPP GEAR CONDITIONS: You are in MOPP 4 with individual gear. Your
MOPP gear is contaminated. Your Buddy is in MOPP 4 and is available for MOPP
gear removal. You have your M291 SDK and your Buddy has M295 IEDK. STANDARDS: Decontaminate your individual gear and equipment
without spreading the contamination and place it on an uncontaminated surface.
Remove your Buddy’s overgarments, overboots, and gloves. Complete all steps
without spreading the contamination within 20 minutes. PERFORMANCE STEPS: 1. Decontaminate your individual gear without assistance. NOTE: If at any time during the technique you suspect you
have spread contamination onto your skin or undergarments, decontaminate
immediately with the personal decontaminating kit. Then proceed with the MOPP
gear removal. a. Cover your gear (weapon, LCE, helmet, mask carrier, and
rucksack) with your Buddy’s M295 IEDK. NOTE: Weapon will be cleared and placed on safe prior to
decontamination. CAUTION: Keep decontaminating powder out of eyes, lips,
cuts, and wounds. Cover exposed cuts or wounds with appropriate first aid wrap
or bandage prior to handling the packets. b. Set your gear aside on an uncontaminated surface. 2. Decontaminate your Buddy’s hood and mask. a. Candidate— (1) Loosens Buddy's drawcord (except quick-doff hood). (2) Unattaches Buddy's underarm straps from under his or her
arms and places straps over the shoulders. (3) Reattaches Buddy's straps to the Velcro
References: STP 21-1-SMCT #031-503-1023
(4) Wipes Buddy's mask eye lens outserts first with M291 SDK.
(5) Wipes Buddy's entire mask from the top of the hood down with M291 SDK.
b. Candidate decontaminates his or her own gloves with the personal decontaminating kit after Buddy's mask is decontaminated.
3. Roll your Buddy’s hood.
NOTE: For hoods with zippers, leave the zipper closed.
a. Candidate lifts Buddy's hood straight up off his or her shoulders by grasping the straps.
b. Candidate pulls Buddy's hood over his or her head until most of the back of his or her head is exposed, but the hood should not be completely over Buddy's face.
c. Candidate tells Buddy to place his or her hand over the voice transmitter, if necessary, to prevent the mask seal from being broken.
d. Candidate rolls Buddy's hood tightly, starting at the chin and working around the mask without pulling it completely off the back of his or her head.
4. Remove your Buddy’s jacket.
a. Candidate—
(1) Unties Buddy's cord.
(2) Unfastens Buddy's snaps/Velcro
® on the front of his or her jacket.(3) Unzips Buddy's jacket.
(4) Unsnaps Buddy's snaps in the back of his or her jacket from his or her overgarment trousers.
b. Candidate tells Buddy to make a fist.
c. Candidate pulls Buddy's jacket off, turning the jacket inside out.
d. Candidate places Buddy's jacket on the ground nearby with the black side up.
NOTE: Buddy will use the jacket later as an uncontaminated surface to stand on.
5. Remove your Buddy’s trousers.
a. Candidate opens Buddy's trouser cuffs, waist snap, zipper and, if necessary, waist tabs.
b. Candidate grasps Buddy's trouser leg by the cuff.
c. Candidate tells Buddy to pull his or her legs from the trousers, one leg at a time.
6. Remove your Buddy’s overboots.
a. Candidate tells Buddy to stand next to his or her jacket.
b. Candidate loosens Buddy's overboot strings.
c. Candidate pulls Buddy's overboots off, one at a time.
d. Candidate tells Buddy to step onto his or her jacket as his or her overboots are removed.
7. Remove your Buddy’s rubber gloves. Candidate helps Buddy remove his or her rubber gloves and drops the gloves onto the contaminated ground so that the Buddy does not touch the outside of the rubber gloves with his or her bare hands.
8. Remove your Buddy’s MOPP gear without further contaminating self or Buddy.
9. Correctly performed all performance steps for each performance measure within 20 minutes.
REFERENCES:
Required Related
FM 3-5
STP 3-54B1-SM, Task No. 031-503-1023
Note: If contamination occurs, the decontamination procedures are permitted; however, no additional time will be given to the candidate. For EFMB purposes, the candidate will only be required to remove MOPP gear.
Click on the EFMB Badge to view the SURVIVAL portion of the EFMB Study Guide.
You can also download the entire EFMB Study Guide, to a directory of your choice, double click on it to unzip it. You can then read the contents which are now in PDF format with the Acrobat Reader.
You must also have a copy of Adobe Acrobat Reader to view the study guide.
Click on the EFMB Badge to view the Survival Tasks portion of the EFMB Study Guide.

Click on the EFMB Badge to view the NBC OPERATIONS portion of the EFMB Study Guide.

Click on the EFMB Badge to view the Field Hygiene and Sanitation portion of the EFMB Study Guide.
This lane is also referred to as the NBC lane because most of the tasks deal with NBC. There could be distinct differences in how you have always performed these tasks. I stress that you should perform them exactly how the instructors teach it and how the graders expect to see it. All tasks are referenced to STP 21-1-SMCT, the Soldiers Manual of Common Tasks, Skill Level 1. Some standards, however, have been modified for the EFMB test. The time limits, for example, are for EFMB only.
Basically, there are many options on this lane. Try to prep as much of your equipment as allowed before you actually test the lane. For instance,
tape over the metal parts of LBE's and pro-mask carriers before we going
to the lane. Also, completely tape up the hand guards of your M16 (this keeps dirt from getting in there, too!!!). You can also do the butt stock, but it's really not necessary.
Each test has different rules for advance preparation of equipment. Some places won't let you advance prep at all!!!
Utilize materials provided on the lane to camouflage yourself and equipment. Don't try to be too creative in your camouflage. Remember this is a time event.
Make sure your NBC equipment is serviceable BEFORE you even go to the field site. If the zipper on your right leg does not work, too bad - NO GO!!!
If you have officers in your squad, please be considerate and make sure they know how to take apart the M16 and put it back together. Every soldier has the responsibility to ensure their officers are squared away on this task. Remember, they all probably use the M9 Berreta 9mm pistol.
Every night, for at least 10 times, practice getting that mask on in time.
Remember this is a reaction lane under simulated combat conditions. Review of the following tasks may prove helpful in preparing you for the lane. 071-326-0502 Move Under Direct Fire; 071-326-0503 Move Over, Through, Or Around Obstacles (Except Minefields); 071-331-0815 Practice Noise, Light, and Litter Discipline;and 031-503-1019 React to Chemical or Biological Hazard/Attack.
Camouflage
-turn the cat eyes on your kevlar inward or tape them
-Em Nu anything shiny on your LBE and kevlar
-button the top button of your BDU shirt
-set your camouflage sticks in the sun to soften it
Functions Check
SPORTS
Donning your Mask
Putting on MOPP Gear
Deconning Your Skin
Deconning Your Equipment
Deconning Your Buddy
Removing/Storing Your Mask
Choosing a Canister
"I am checking for dents, dirt, cracks, and for the expiration dates."