LESSON 21
INSERT AN OROPHARYNGEAL AIRWAY
IN AN UNCONSCIOUS CASUALTY
TASK
Identify the procedures for inserting and maintaining an oropharyngeal airway in an unconscious casualty.
CONDITIONS
Given multiple-choice items pertaining to the oropharyngeal airway (J-tube) and its use.
STANDARD
Score 70 or more points on the 100-point written examination.
REFERENCES
STP 8-91B15-SM-TG, MOS 91B Medical Specialist
21-1. INTRODUCTION
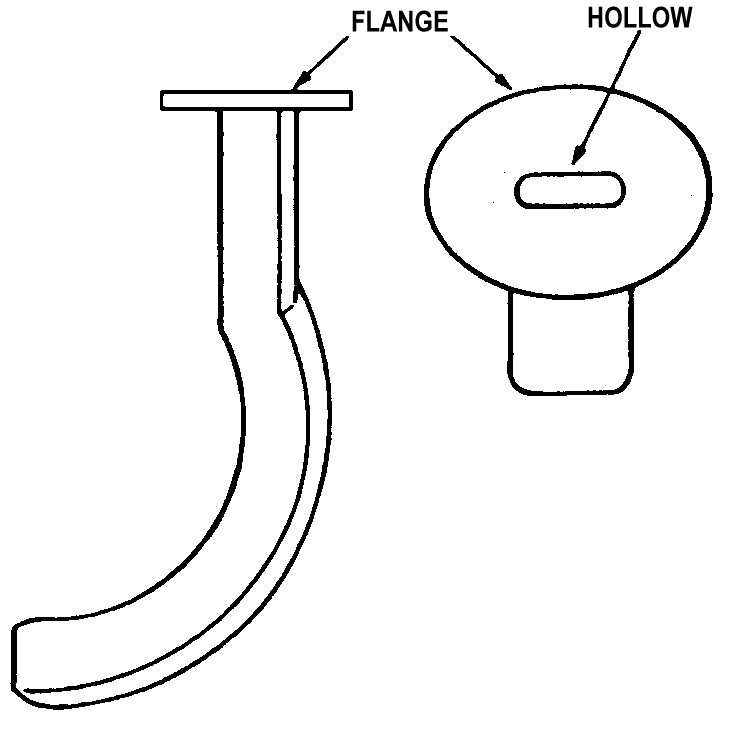
One of the basic tasks of the combat lifesaver is to restore and maintain respiration (breathing). When the casualty is unconscious, there is always a danger his tongue will slide to the back of his throat and block his airway. This situation can be prevented by inserting an oropharyngeal airway. The airway is a hollow tube through which air can freely pass in and out. The oropharyngeal airway (also called the oral pharyngeal airway or artificial airway) in the aid bag resembles the letter "J" and is often referred to as the J-tube.
21-2. IDENTIFY WHEN THE OROPHARYNGEAL AIRWAY IS USED
The oropharyngeal airway is only used with an unconscious casualty and only if the casualty is breathing on his own (casualty never stopped breathing or breathing was restored). Be aware of or suspect spinal injury in an unconscious casualty and maintain in-line stability if an oropharyngeal airway is used.
WARNING
Do not insert the oropharyngeal airway if the casualty is conscious or semiconscious since the casualty may still have a gag reflex. If the airway causes the casualty to gag, he may vomit and inhale some of the vomitus. Remove the airway anytime the casualty regains consciousness or begins to gag.

FIGURE 21-1. OROPHARYNGEAL AIRWAY (J-TUBE)
21-3. DETERMINE IF THE OROPHARYNGEAL AIRWAY IS THE APPROPRIATE SIZE
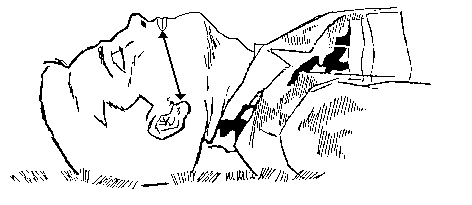
Place the oropharyngeal airway along the outside of the casualty's jaw with one end of the airway at the bottom tip of the casualty's ear. Close the casualty's mouth (jaw in normal position) and bring the other tip of the airway toward the corner of the casualty's mouth. The airway should reach from the bottom tip of his ear to the corner of his mouth. If the airway is too short, it might not be able to hold the casualty's tongue in place. If the airway is too long, it might injure the casualty's throat. Also, the oropharyngeal airway might completely block the casualty's airway if is not the correct size.
Choose the airway that is nearest to the proper size (tip of ear lobe to corner of mouth).

FIG 21-2 PROPER SIZE OF OROPHARYNGEAL AIRWAY
21-4. INSERT THE OROPHARYNGEAL AIRWAY
Position the casualty on his back (may already in this position).
Place your thumb and your index finger of one hand on the casualty's upper and lower teeth near a corner of his mouth so they will cross when the casualty's mouth is opened (crossed-finger method).
Push your thumb and your index finger against the casualty's upper and lower teeth in a scissors-like motion until his mouth opens.
WARNING:
Do not place your fingers inside the casualty’s mouth.
Once the casualty's mouth is open, maintain his airway. This is normally accomplished using the head-tilt/chin-lift method. Use the jaw-thrust method if the casualty has a possible fracture of the neck or spine or if the casualty has a severe head injury.
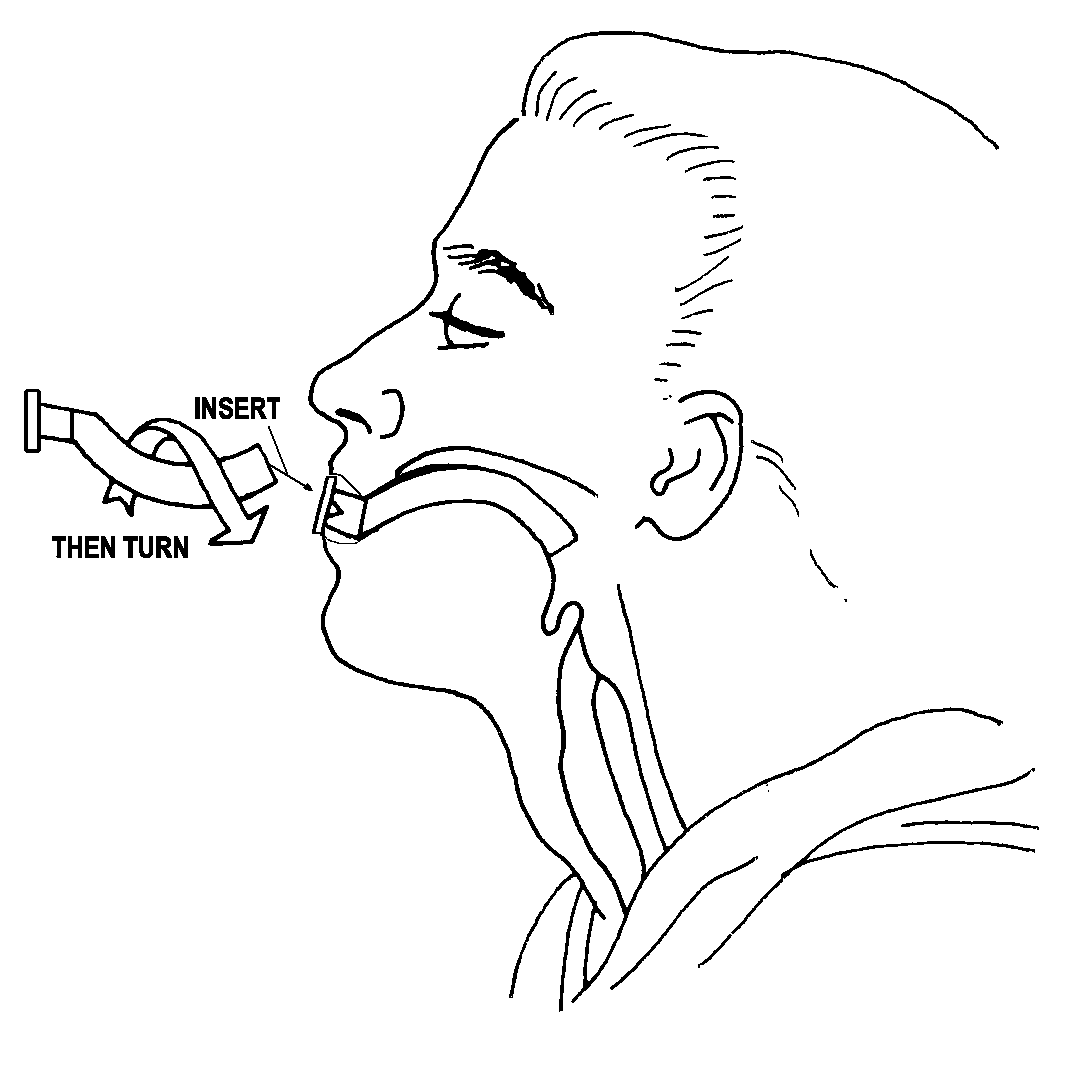
Place the tip end (not the flanged end) of the oropharyngeal airway into the casualty's mouth. Make sure the tube is on top of the tongue.
Position the airway with the tip pointing up toward the roof of the casualty's mouth. This will help to keep the tongue from being pushed toward the back of the throat as the airway is inserted.
 Slide
the airway along the roof of the casualty's mouth, following the natural
curvature of the tongue.
FIGURE 21-3. INSERTING THE OROPHARYNGEAL AIRWAY
When the tip of the airway reaches the back of the tongue (past the soft palate), rotate the airway 180o so the tip end of the airway is pointing down toward his throat. If the airway is difficult to insert or rotate, grasp the casualty's tongue with the fingertips of the hand not holding the airway and gently pull the tongue forward.
Advance the airway until the flange rests against the casualty's lips. The airway should now be positioned so the tongue is held in place and does not slide to the back of the casualty's throat.
21-5. MONITOR A CASUALTY WITH AN OROPHARYNGEAL AIRWAY IN PLACE
Check the casualty's respirations to make sure he is still breathing adequately and the oropharyngeal airway is not blocking his airway. Adjust the position of the oropharyngeal airway, if needed. If the oropharyngeal airway completely blocks the casualty's airway, remove the artificial airway and keep the casualty's airway open using the jaw thrust or the head-tilt/chin-lift.
Remove the oropharyngeal airway if the casualty begins to gag or regain
consciousness. If the airway is not removed, the casualty may vomit.
NOTE: The casualty may push the oropharyngeal airway out of his mouth as he regains consciousness.
Do not tie or tape the airway in place.
NOTE: A combat medic may tie or tape the oropharyngeal airway in place during evacuation to keep the airway from being dislodged if the casualty can be watched constantly.