Lesson 15 Part 2
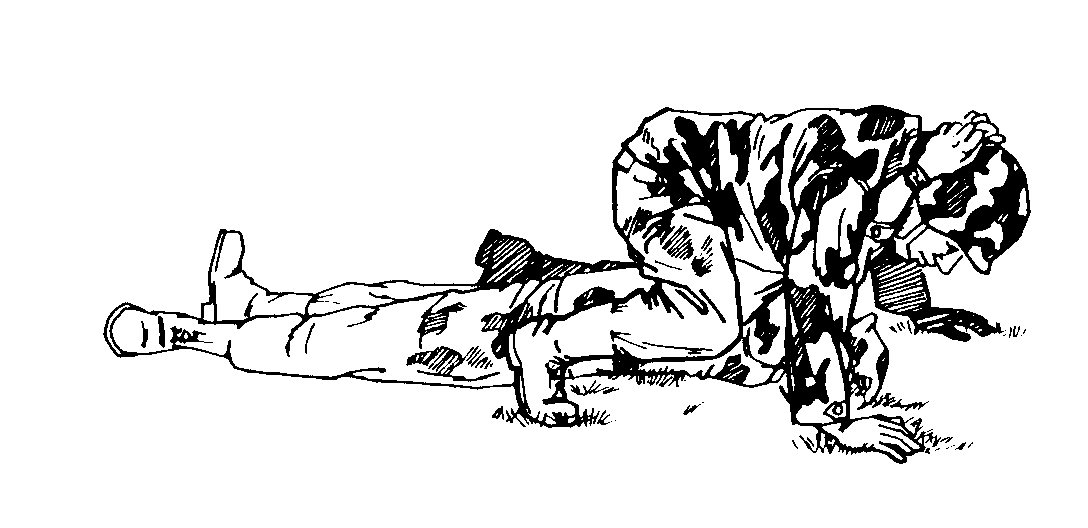
15-13. PERFORM THE NECK DRAG

FIGURE 15-10. NECK DRAG
Tie the casualty's hands together with material that will not cut his wrists, such as the casualty's field dressing or a cravat. Do not tie the materials tight enough to interfere with the blood circulation. If the casualty is conscious, have him interlock his fingers.
Face the casualty's head and straddle his hips on your knees.
Loop the casualty's arms around your neck.
Crawl forward on your hands and knees, dragging the casualty beneath.
CAUTION: Keep the casualty's head from dragging on the ground.
15-14. PERFORM THE CRADLE DROP DRAG
Position the casualty on his back.
Kneel at the casualty's head.
Slide your hands (palms up) under his shoulders and grasp the clothing under his armpits.
Partially rise so the casualty is pulled to a semi-sitting position. If possible, bring your elbows together and use both forearms to support the head. If not, support his head on one of your arms.
Rise to a stooped position and walk backward, dragging the soldier.
CAUTION: If you are going down steps, walk down them carefully going backward. Support the soldier's head and shoulders, letting his hips and legs drop from step to step.
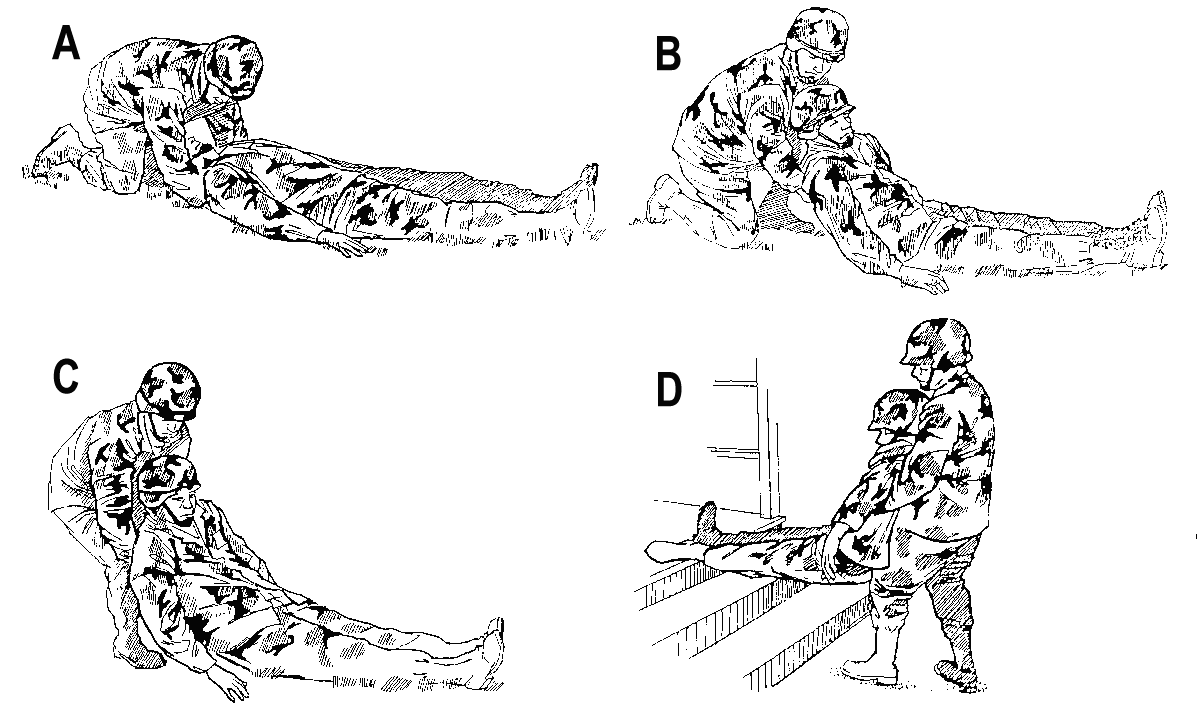
FIGURE 15-11. CRADLE DROP DRAG
SECTION III. TWO-MAN CARRIES
15-15. MOVE A CASUALTY USING THE TWO-MAN FORE-AND-AFT CARRY
Sometimes, a litter is not available and cannot be improvised. In such cases, manual carries are used to evacuate the injured soldier. A two-man manual carry is usually preferred over a one-man manual carry. The two-man fore-and-aft carry can be used to move a conscious or unconscious casualty. It is not as tiring as other carries; therefore, it is usually the preferred two-man carry for moving a casualty for a long distance.
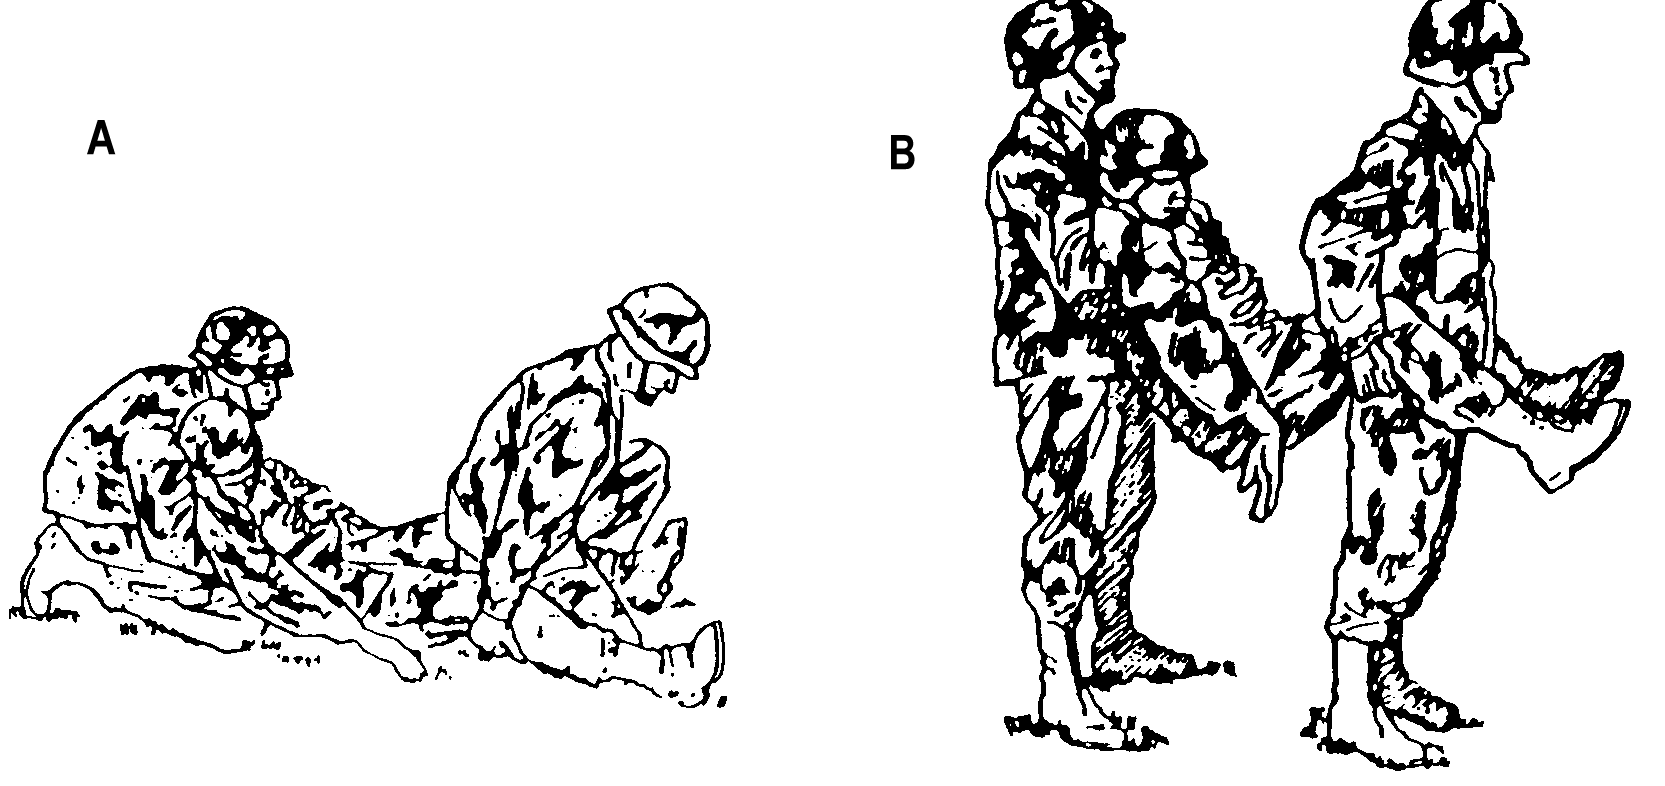 FIGURE
15-12. TWO-MAN FORE-AND-AFT-CARRY
Put the casualty on his back, arms by his sides.
The taller of the two bearers kneels at the casualty's head and faces toward the casualty's feet. He then slides his hands under the casualty's arms, across the casualty's chest, and locks his hands on the casualty's chest.
The taller bearer should always position himself at the casualty's head.CAUTION:
The second bearer spreads the casualty's legs apart and kneels between the casualty's legs with his back to the casualty's head. He then places his hands under the casualty's knees.
Both bearers rise together and lift the casualty.
Both bearers walk forward, carrying the casualty.
15-16. MOVE A CASUALTY USING THE TWO-MAN SUPPORT CARRY
The two-man support carry can be used to transport either a conscious or an unconscious casualty. It is especially useful if the casualty is conscious and needs assistance walking.
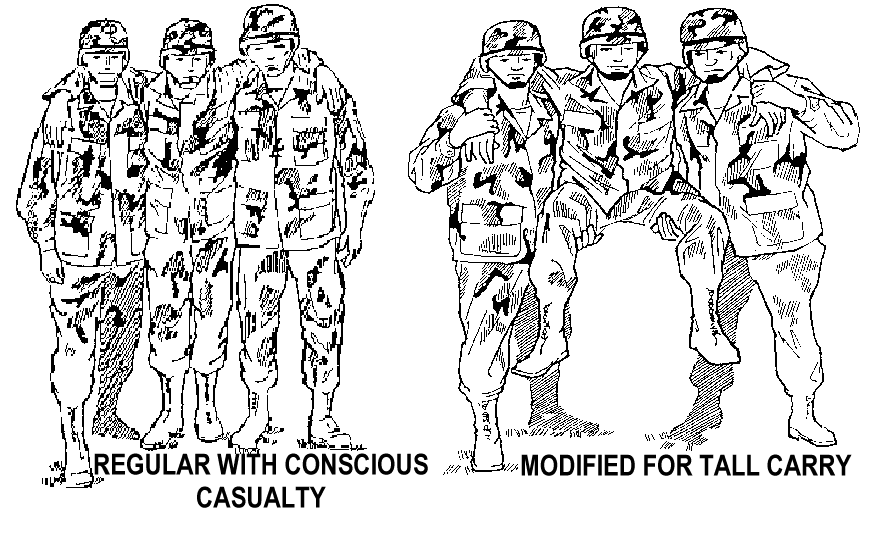
FIGURE 15-13. TWO-MAN SUPPORT CARRY
The bearers kneel on each side of the casualty and face the same direction as the casualty.
Each bearer takes the casualty's nearest arm, brings it around his neck, and grasps the casualty's wrist in his outside hand.
Each bearer puts his other arm (the arm that is nearest the casualty) around the casualty's waist.
Both bearers rise in unison, lifting the casualty. If the casualty is conscious, he can help the bearers lift his weight and may be able to walk with assistance. The arms around the casualty's waist should support most of the weight.
CAUTION: If the casualty is unconscious, do not release his wrists.
CAUTION: If the casualty is taller than the bearers, the bearers can remove their arms from around the casualty's waist and use them to lift and support the casualty's thighs. This will keep the casualty's feet from dragging.
15-17. MOVE A CASUALTY USING THE TWO-MAN ARMS CARRY
The two-man arms carry can be used to move a conscious or unconscious casualty for a moderate distance.
CAUTION: More than two bearers may be required if the casualty is heavy or if the casualty's head or legs need additional support. If a casualty with a back or neck injury has to be moved by manual carry, a four-man arms carry is used to keep the casualty's body in alignment. This carry was discussed in Lesson 10 paragraph 10-3 in this subcourse.
FIGURE 15-14. TWO-MAN ARMS CARRY
Position the casualty on his back and place his arms on his abdomen. If the casualty is unconscious, his hands may be loosely tied together at the wrists.
Both bearers position themselves on the same side of the casualty -- one at the casualty's chest and one at his thighs.
Both bearers kneel on one knee.
The bearer at the casualty's chest slips one arm beneath the shoulders and the other arm beneath his waist.
The bearer at the casualty's thighs slips one arm beneath the casualty's hips and the other arm beneath his knees.
Both bearers shift their weight backward in unison and lift the casualty to knee level, keeping the casualty as level as possible.
Both bearers turn the casualty's front toward to their chests.
Both bearers rise to their feet in unison.
Both bearers move forward, carrying the casualty high on their chest. (This lessens fatigue while transporting the casualty.)
15-18. MOVE A CASUALTY USING THE TWO-HAND SEAT CARRY
The two-hand seat carry can be used to move a conscious or unconscious casualty for a short distance. It can also be used to place a casualty onto a litter.
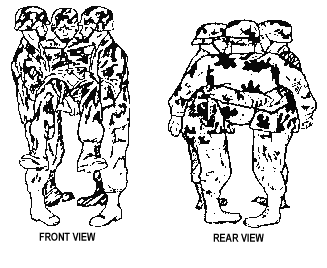
FIGURE 15-15. TWO-HAND SEAT CARRY
Position the casualty on his back.
The bearers position themselves on opposite sides of the casualty's hips, face each other, and kneel.
Each bearer passes one arm under the casualty's back and the other arm under the casualty's thigh.
The bearers grasp each other's wrists securely.
Both bearers rise in unison, lifting the casualty.
Both bearers move forward, carrying the casualty.
15-19. MOVE A CASUALTY USING THE FOUR-HAND SEAT CARRY
The four-hand seat carry is only used to carry a conscious casualty who can help support himself while he is being carried. This carry is especially useful in transporting a person with a head or foot injury for a moderate distance. It can also be used to place a casualty onto a litter.
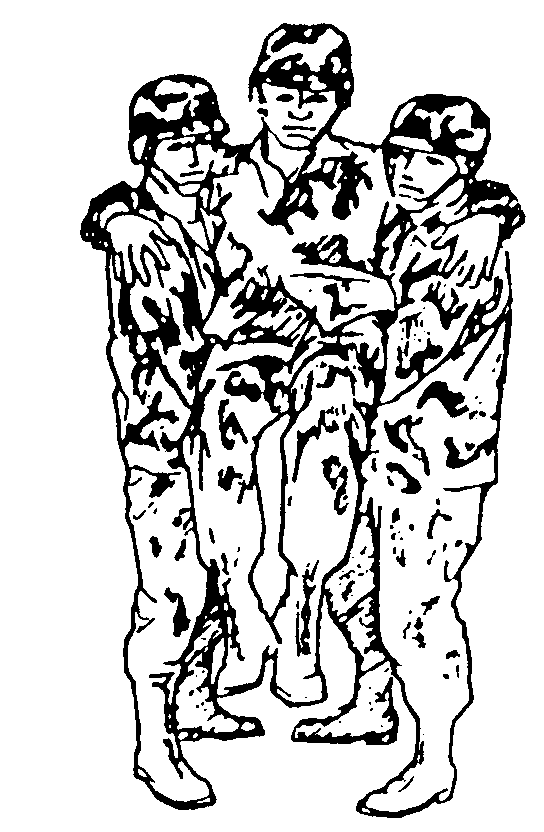
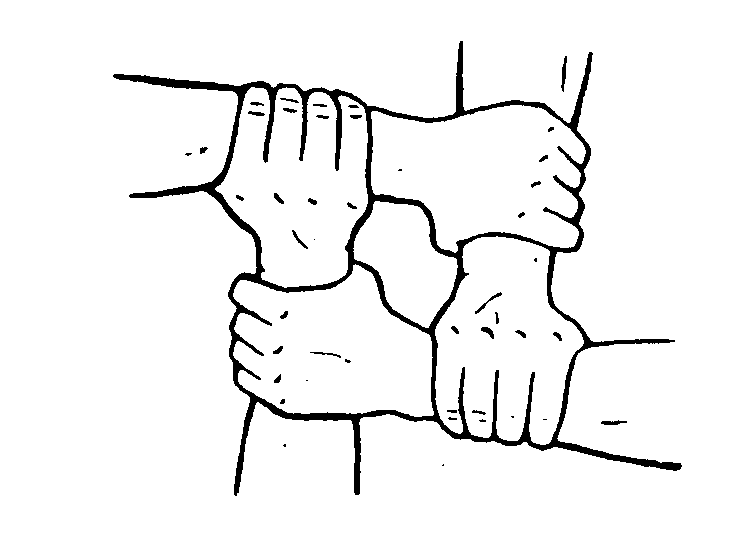
FIGURE 15-16. FOUR-HAND SEAT CARRY
Both bearers position themselves behind the casualty and face each other.
Each bearer grasps his own left wrist with his right hand and grasps the other bearer's right wrist with his left hand. This forms the seat for the casualty.
The casualty stands on his own or another soldier helps the casualty to a standing position.
Both bearers lower their bodies so the seat is low enough for the casualty to sit (about even with the casualty's knees).
The casualty sits on the bearers' forearms and places his arms around the bearers' shoulders for balance and support.
Both bearers stand erect in unison, lifting the casualty.
Both bearers move forward.
SECTION IV. LITTERS
15-20. MAKE AN IMPROVISED POLE AND PONCHO LITTER
An improvised litter can be made using two tent poles and a poncho. Variations of this litter include using straight tree limbs or similar rigid objects for the poles. When the casualty is placed on the litter, his weight will hold the litter together.
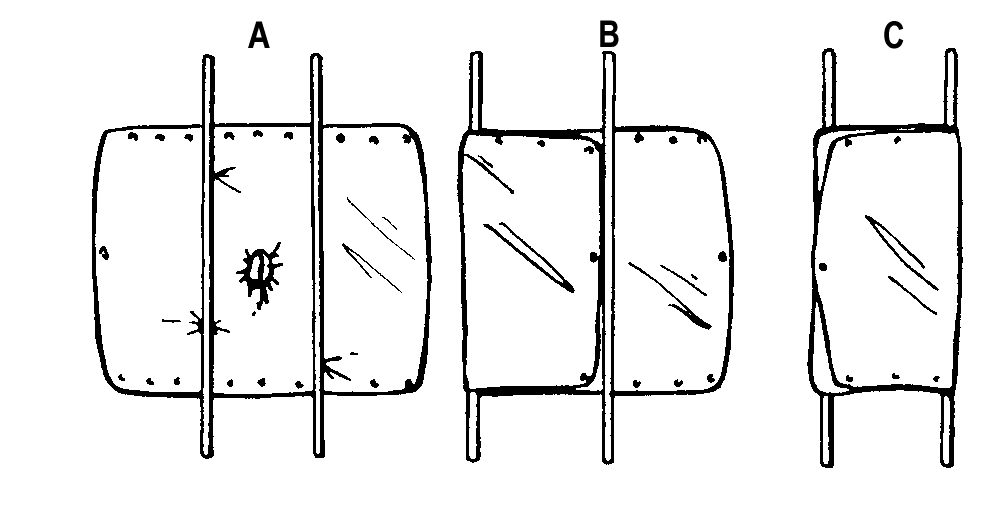
FIGURE 15-17. CONSTRUCTING AN IMPROVISED POLE AND PONCHO LITTER
Open the poncho and lay it flat on the ground.
Lay two poles across the poncho so the poncho is divided into thirds.
Reach in and pull the hood toward you and lay it flat on the poncho. Make sure the drawstrings are not hanging out of the hole. (The hood and drawstrings could catch on brush or other obstacles if left hanging.)
Fold one outer third of the poncho over the pole.
Fold the other outer third of the poncho over its pole.
15-21. MAKE AN IMPROVISED POLE AND JACKET LITTER
An improvised litter can be made using two tent poles and two or three field jackets. Tree limbs or other straight, rigid objects can be used instead of the poles. Heavy shirts or other jackets can be used instead of field jackets.
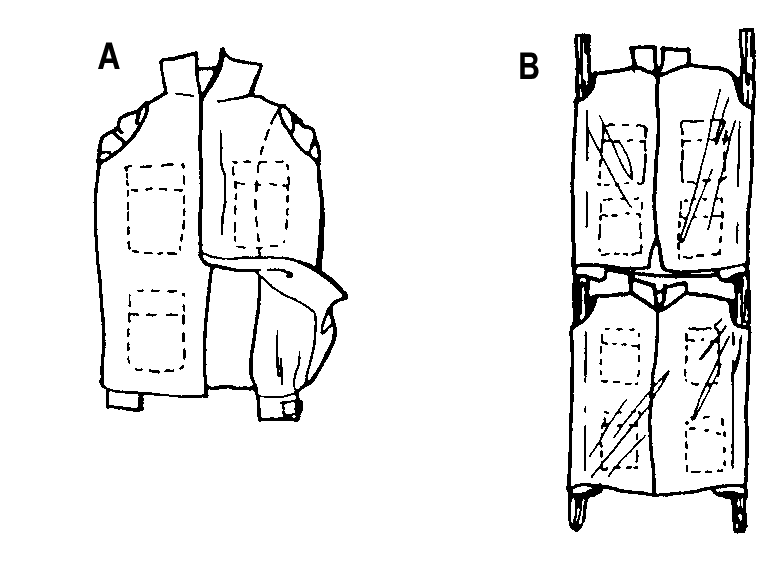
FIGURE 15-18. POLE AND JACKET IMPROVISED LITTER
Close (zip or button) the jackets (or other garments).
Turn the garments inside out, but leave the sleeves inside. Turning the garments inside out puts buttons and zippers on the inside. This keeps the casualty from lying on buttons or zippers (if on top) and keeps them from getting snagged on bushes or other obstacles (if on bottom).
Pass the poles through the sleeves.
15-22. MAKE AN IMPROVISED POLE AND SACK LITTER
An improvised litter can be made using two tent poles or similar rigid objects and two empty heavy fabric sacks, such as potato sacks.
Cut holes in the two corners of the closed end of each sack.
Place the sacks lengthwise so the open ends of the sacks are facing each other.
Slide the poles or limbs through the holes.
Overlap the open ends of the sacks about three inches to provide extra strength in the middle of the litter.
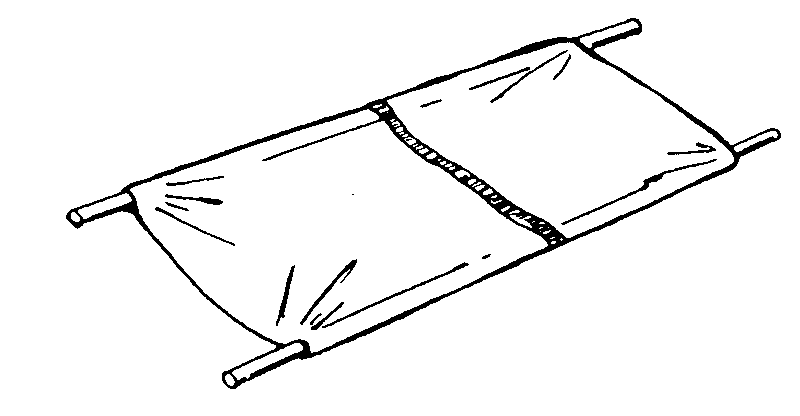
FIGURE 15-19. POLE AND SACK IMPROVISED LITTER
15-23. MAKE AN IMPROVISED BLANKET LITTER
An improvised litter can be made using only a blanket or other material. The blanket is laid on the ground and two opposite edges of the blanket are rolled toward the middle. When the casualty is placed on the blanket, the rolled edges of the blanket are used as grips. Four or more litter bearers should be used when transporting a casualty using the blanket litter.
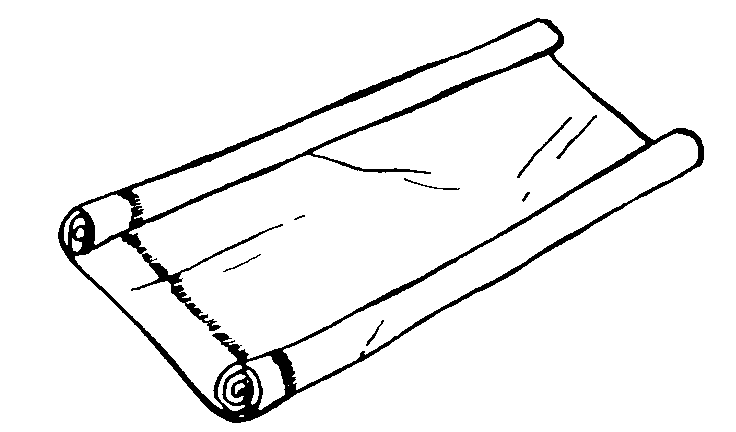 FIGURE
15-20. BLANKET LITTER
15-24. EVACUATE A CASUALTY BY LITTER
Use care when placing the casualty on the litter to avoid causing additional injury to the casualty. A modified two-man manual carry (usually a modified two-man arms carry or a modified two-man fore-and-aft carry) is used to place the casualty onto the litter. Normally, four soldiers are used to transport the litter. The litter team, however, can be composed of more or fewer members based upon the military situation and the distance and terrain to be covered.
NOTE: The litter carry is the preferred manual carry for transporting a casualty.
a. General Rules
Explain the Procedure to the Casualty. If the casualty is conscious, tell him what you are going to do. The explanation will help to calm his fears and will help you to get his cooperation.
Walk Around the Casualty. Walk around the casualty rather than stepping over him. If you step over the casualty, he may flinch or tighten his muscles and aggravate his injuries. In addition, mud or other debris from your boots may fall into his eyes or wound.
Perform Necessary Measures Before Transporting. Make sure the casualty is breathing properly, that open wounds have been dressed and bandaged, and that fractures have been splinted before transporting the casualty (unless the casualty is being moved away from a life-threatening danger).
Have One Person in Charge. One person must give the instructions to the remainder of the team so actions will be performed in unison.
b. Position Litter
Position the casualty on his back with his arms at his sides. Place the litter (standard or improvised) near and parallel to the casualty.
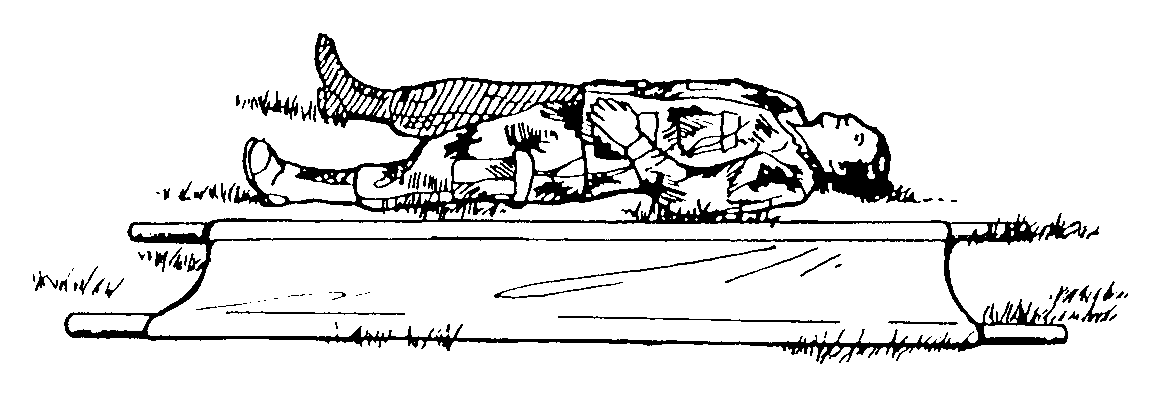
FIGURE 15-21. LITTER PLACED PARALLELTO CASUALTY
c. Place Casualty Onto Litter
Modified Two-Man Arms Carry.
Two litter bearers position themselves on the same side of the casualty (opposite side from litter) and kneel on one knee.
Bearer #1 slips his arms under the casualty's back and waist.
Bearer #2 slips his hands under the casualty's hips and knees.
Both bearers lift in unison upon command from the leader.
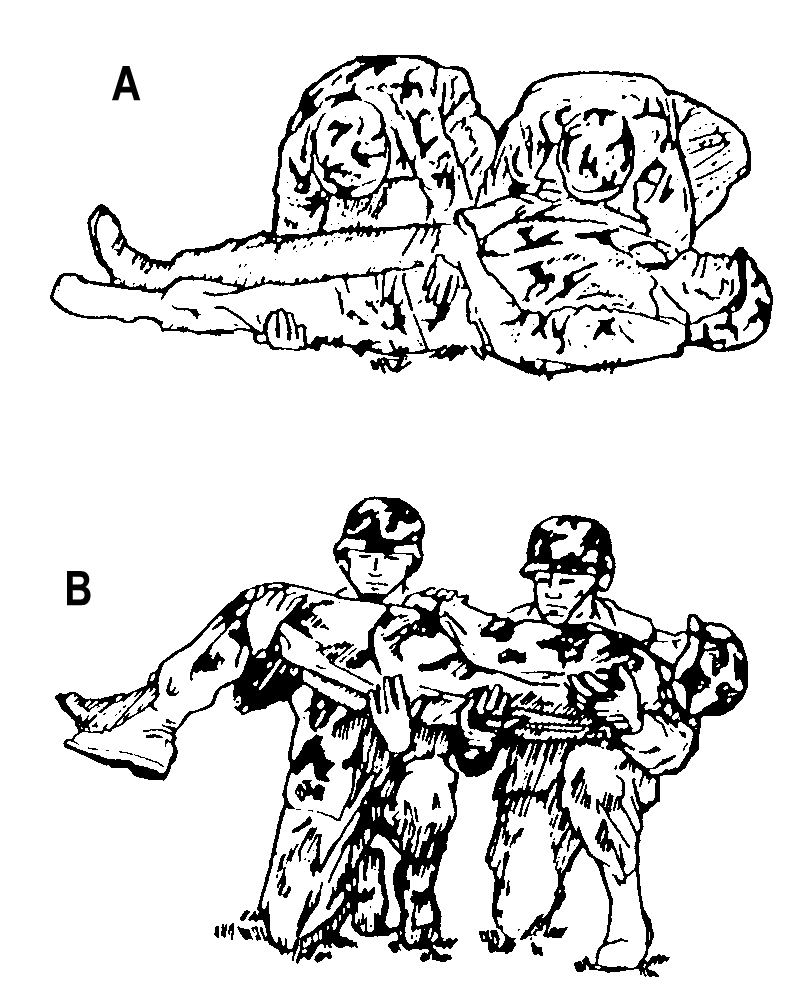
FIGURE 15-22. LIFTING A CASUALTY USING THE MODIFIED
TWO-MAN ARMS CARRY
The bearers move the casualty over the litter or have another soldier push the litter under the casualty.
The bearers lower the casualty onto the litter in unison upon the leader's command.
Modified Two-Man Fore-and-Aft Carry.
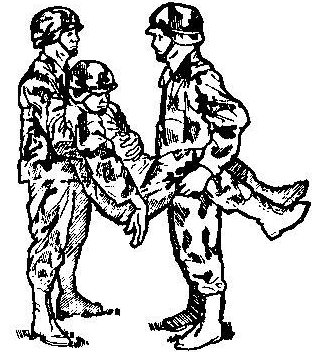
FIGURE 15-23. LIFTING A CASUALTY USING THE MODIFIED TWO-MAN
FORE-AND-AFT CARRY
Bearer #1 kneels behind the casualty's head, slips his arms under the casualty's arms and across the casualty's chest, and locks his hands together. If the two bearers are different in height, the taller should be Bearer #1.
Bearer #2 spreads the casualty's legs apart and squats or kneels between the casualty's legs while facing Bearer #1.
Both bearers rise in unison upon the leader's command.
The bearers move the casualty over the litter.
Both bearers lower the casualty onto the litter in unison upon the leader's command.
d. Lift Litter
If there are four litter bearers, each bearer positions himself at one of the handles, faces so that the casualty will be carried feet first (assuming the casualty will be carried feet first), and kneels on the knee nearest the litter. The leader of the litter team should position himself at the handle nearest the casualty's right shoulder and direct the other bearers. This position allows the leader to monitor the casualty during the evacuation.
Upon command of the leader, the four litter bearers lift the litter in unison and move the casualty to the aid station or collection point.
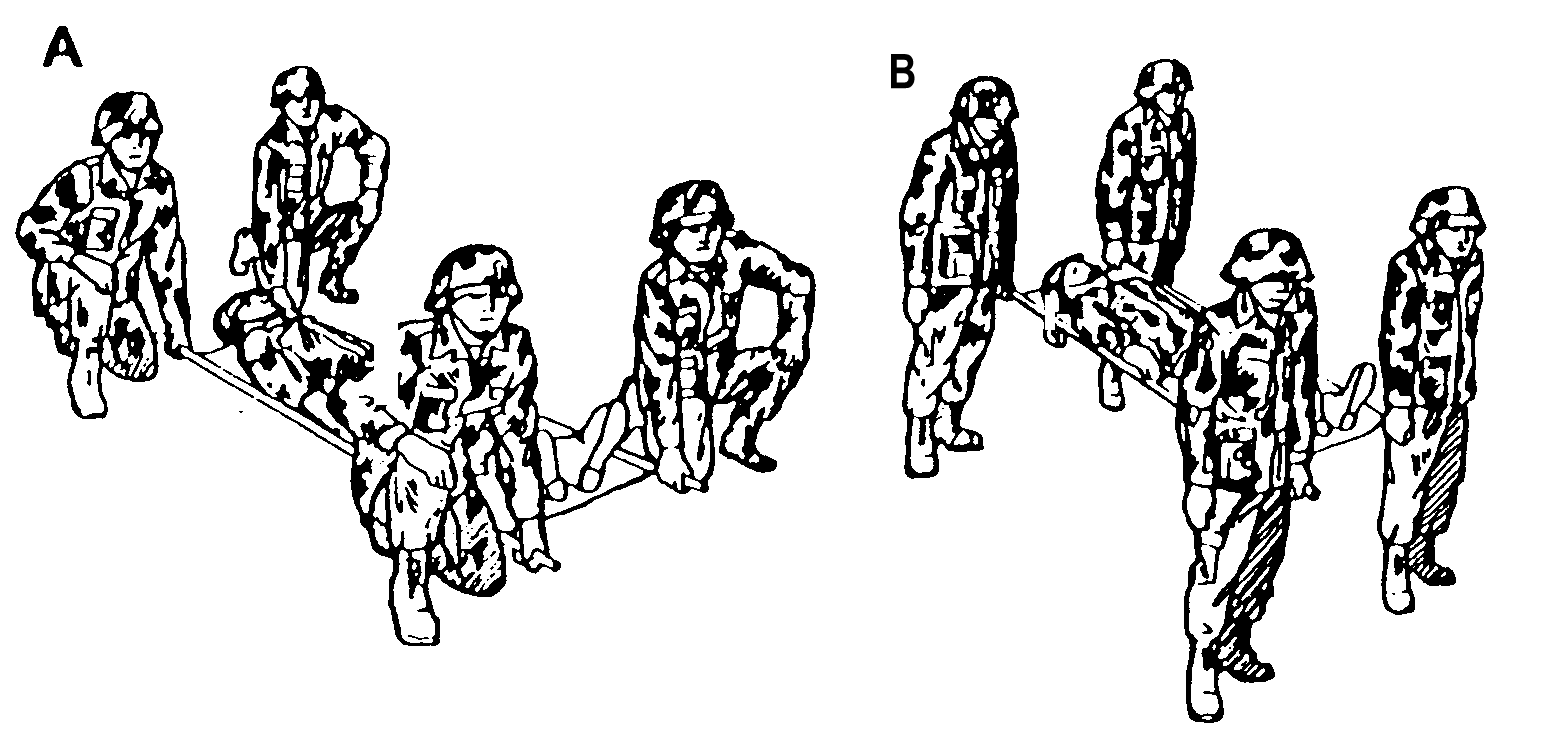 FIGURE
15-24. LIFTING A LITTER
If one or more individuals are available to help, practice performing one-man manual carries described in this lesson, especially the fireman's carry and the pistol-belt carry. (You will need two pistol belts or other material to make a loop for the pistol-belt carry and pistol-belt drag.) Check your performance against the performance checklists and the lesson materials.
If one or more individuals are available to help, practice performing two-man manual carries. Check your performance against the performance checklist.
If possible, practice making improvised litters. Check your performance against the performance checklist.
If one or more individuals are available to help, practice placing the casualty onto the improvised litter, lifting the litter, and carrying the litter. Check your performance against the performance checklist.